With 80% of the world’s population using Instagram, Facebook, TikTok, swiping reels for gym ideas, cooking, trading strategies, motivation, and more, video plays a vital role, be it for entertainment or for marketing a product to tell about its features properly.
Even you might’ve observed that on YouTube or any other social media platform, users prefer high-quality, up to 60 FPS and 100% Ultra HD video content, Right?
Now let’s suppose that you’re a beginner wanting to create a full-time YouTube channel on WorldNews Content, or educational stuff, what you first need is a free AI video generator software to get professional-looking videos without spending even a single dollar.
But, with so many options out there, how are you gonna choose the right Best free video editing software that can offer you not only an easy user interface, advanced editing tools, and special effects (like mp3-mp4 merging feature) but also an affordable budget?

Here, in this blog, we’re gonna tell you the 10 best tips that you need to keep in mind when choosing the perfect video editing software for YouTube short editing needs.
What are the Best Tips to Select the Right Video Editing Software?
Just you need to consider these 10 tips to select the right video editing software:
Understand Your Needs
First off, you ask yourself, Why do you need video editing software? What specifics do you require? What type of video content you be covering, like vlogs, short films, and reels? In this way, you can go for video editing software that offers you features you need like built-in templates and musical effects for short films and advanced video editing tools for ASMR videos.
Budget and Pricing
Budget is one of the most important factors to consider when browsing different options to select the perfect video editing tool. Look! Some tools are absolutely free, while others require a one-time purchase or annual subscription. Please make sure that the video editing tool you purchase fits your budget and offers you all the features you need. CapCut, in such a case, can be your best option as it offers basic free tools for beginners and premium tools for advanced professional editing.
Ease of Use and Learning Curve
You should also make sure to choose a video editing tool with features that match your skill. Like if you’re a newcomer to this, you should go for user-friendly tools with an easy interface. And if, let’s say you’re a professional bro, you might easily handle more complex software with highly advanced features. This can help you save time and reduce frustration when editing a video.
Video Format Support
Please make sure that the video editing software you choose supports the video format you wanna work with, like choosing tools with built-in multi-GPU acceleration for smoother performance of high-resolution footage or 4K videos. Do you know why? Because it ensures that your tool can handle the video format easily.
Advanced Editing Tools
If you wanna upload YouTube animation videos or short films, you’ll definitely need advanced features like color grading to create a consistent look, chroma-keying, and multi-camera editing to capture the essence of your content. So, pick the tool that offers these capabilities, as it can significantly boost the visual appeal of your YouTube videos, engaging a lot of the public.
Special Effects and Music Integration
Look out for features like special effects for adding a professional touch, transition, and mp3 merging to help set the tone of your video. What these features do, is that they boost the look of your videos and make it more engaging. Along with that, please look out for a tool that offers an in-built caption generator, to make your content more accessible worldwide. The caption generator feature automatically generates subtitles for your audio. This saves you time and ensures 100% accuracy.
Customer Support
Let’s say you’re using a video editing tool and all of a sudden you happen to get into some technical issue. Now, what to do? You need to connect to tech support! That’s why make sure to choose software with quality customer support, like tutorials, forums, and multi-support channels like live chat and ticketing. It’ll further help you resolve tech bugs instantly and you can continue working on your projects.
Operating System Compatibility
It feels nice to work on software if it is compatible. Make sure to look for video editing software that offers multiple operating system options like Windows, Linux, and macOS. See! Some tools are cross-platform (highly compatible), while others provide specific OS options. So choose wisely!
Trial Versions and Reviews
Yes, this is also really important when choosing the right software! Please read user reviews to understand the performance and any sort of issues. This way you can get valuable information from other users of the software. You can also go for the trial version of the software to help you understand the features and technicalities involved in using the tool.
Project Complexity and Frequency of Use
Lastly, keep in mind the complexity of your projects and how often you’ll use the tool. See! If you want to use the tool only once, then go for the free version of the tool. But if your project is highly complex and requires video editing on a regular basis, then go for the premium plan that gives you more features or you can also choose Premium Free AI video generator Software.
How to Use the CapCut Desktop Video Editor to Edit Videos?
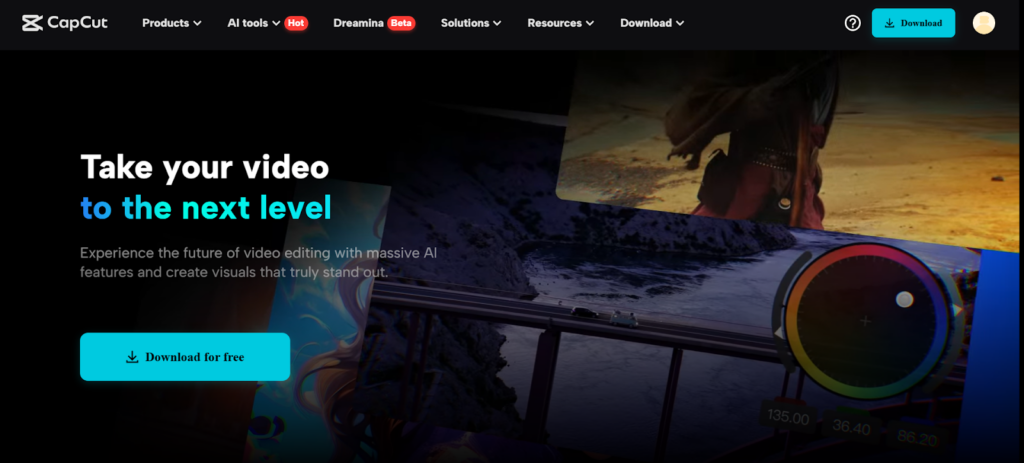
Below, we’ll show step-by-step (also include screenshots for a better look) how you can use the CapCut desktop video editor to edit Instagram reels. Wanna know why we’re using CapCut? See! It is highly user-friendly and offers basic to advanced video editing features to help both newcomers and professional editors.
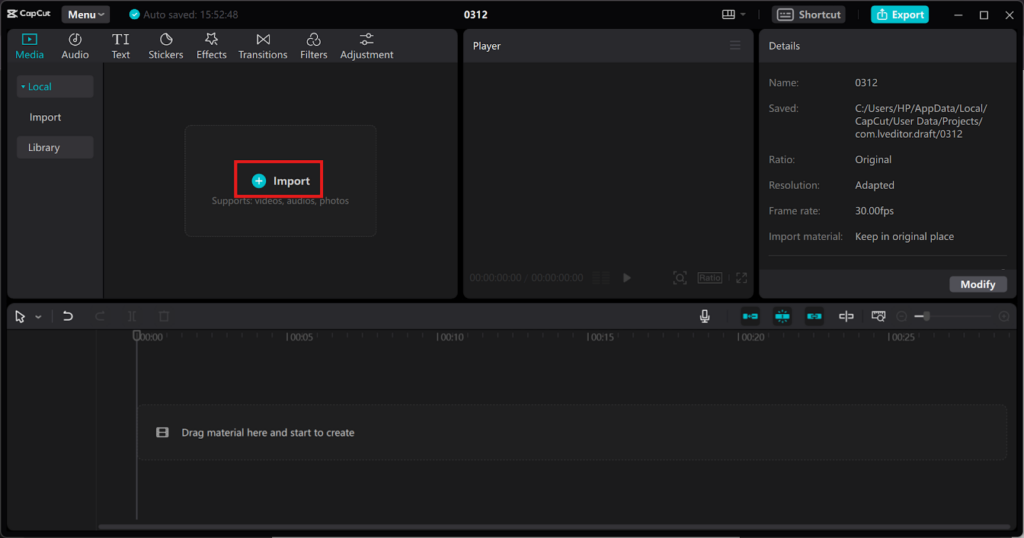
Step 1: Launch CapCut & Upload Videos
- Open CapCut >> Create a new project by Clicking Create Project.
- This will direct you to the editing interface where you can import your video files >> Now, click on the Import button to upload your videos from your computer.
- You can drag and drop the videos directly to the software.

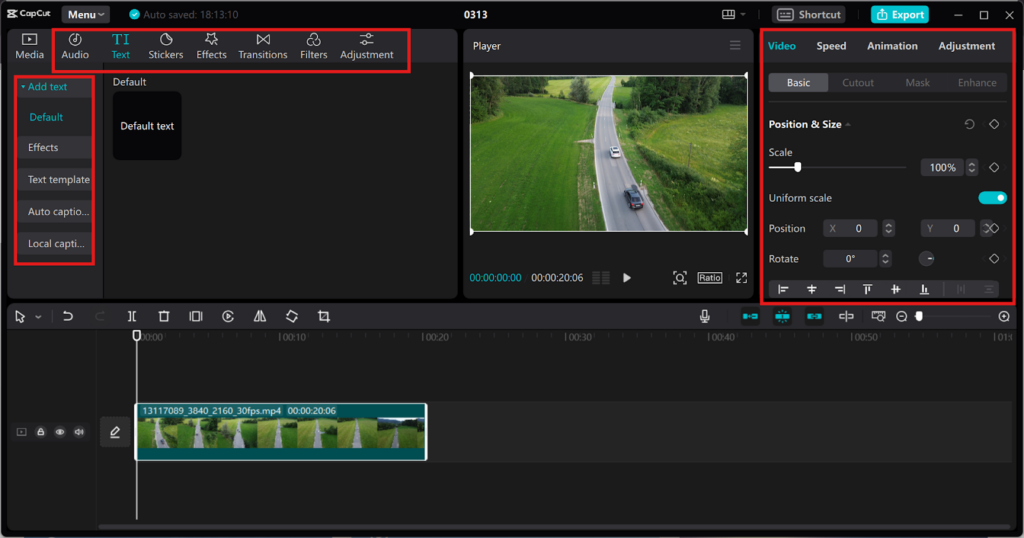
Step 2: Customize the Video
- Now, apply filters & effects to boost the look of your video. (CapCut offers a variety of filters that can switch the mood and style of your video) Like Vintage to Cinematic look
- Use transitions to connect different scenes smoothly
- Add text to provide context (It highlights key messages that you want to convey to the viewers)
CapCut’s AI-built auto-caption feature can automatically generate subtitles, making your content more understandable.

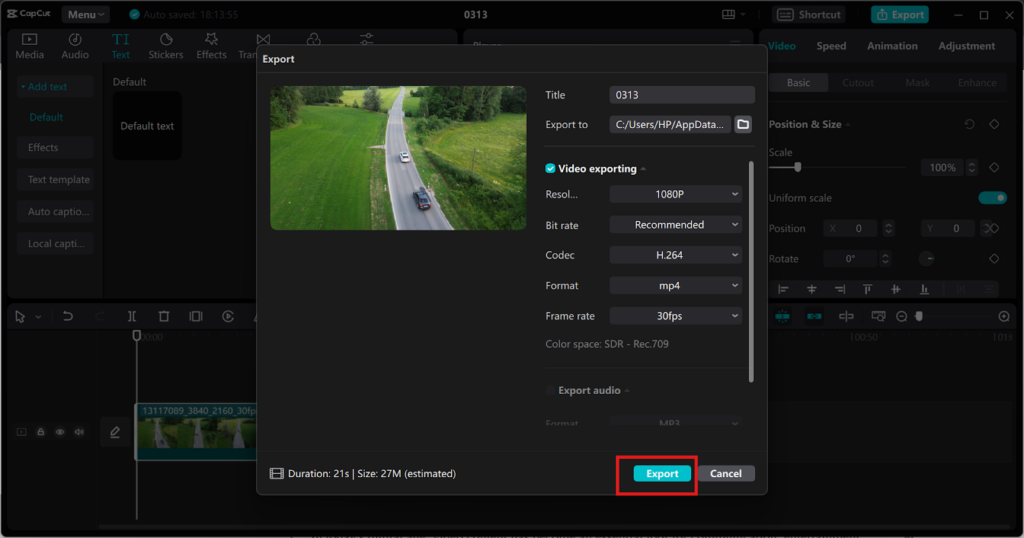
Step 3: Download and Save
- As you’ve completed video editing, now it’s time to Export your video.
- Just go through your project to check everything is as you want (From the arrangement of clips to the audio levels)
- Now, use CapCut’s preview feature to check your video before exporting.
- When ready, Click on the Export button located at the top right corner of your CapCut interface.

If you’re exploring tools to improve your browsing experience, you’ll love our detailed breakdown of the Best Ad Blocker for Chrome. It’s a super helpful guide that compares the top ad blockers available right now — helping you choose the perfect one for a cleaner, faster, and distraction-free web experience. Give it a quick read, it might just be the browser upgrade you didn’t know you needed!
Many businesses struggle with disconnected apps, data silos, and inefficient processes when scaling their operations. To solve this, we’ve created a complete breakdown of the best iPaaS software, highlighting the most reliable integration platforms to automate workflows, connect cloud tools, and improve operational efficiency — making it easier to choose the right solution for your business needs.
Conclusion
So, here we are! We’ve learned how smoothly you can use CapCut video editing features to engage your audience. We’ve even used high-quality screenshots to help you understand every inch of the steps involved.
Besides, you even got to know tips like easy budget, friendly to use, advanced features, and interface compatibility that can help you choose the best AI video editing tool out of so many options available.
Finally, you can edit the videos on your own and upload them on your YouTube channel, right? You can use special effects like transition, music integration, and captions that can help you hit million views and happy subscribers.


![What are the Benefits of DMCA Ignored Hosting In [current_date format='Y']? benefits of DMCA ignored hosting](https://qloudhost.com/blog/wp-content/uploads/2024/08/benefits-of-dmca-ignored-hosting-100-375x195.jpg)

Leave a Comment